FieldValue
ComponentsCometChatConversations, CometChatCallLogs, CometChatUsers, CometChatGroups
LayoutTabbed bottom navigation (Chats, Calls, Users, Groups)
PrerequisiteComplete Kotlin Integration or Jetpack Compose Integration Steps 1–3 first
PatternFull-featured messaging app with multiple sections
This guide builds a tabbed messaging UI — Chats, Calls, Users, and Groups tabs via bottom navigation, with each tab loading its CometChat component. This assumes you’ve already completed the integration guide for your chosen UI toolkit (project created, dependencies installed, init + login working).

What You’re Building

Two sections working together:
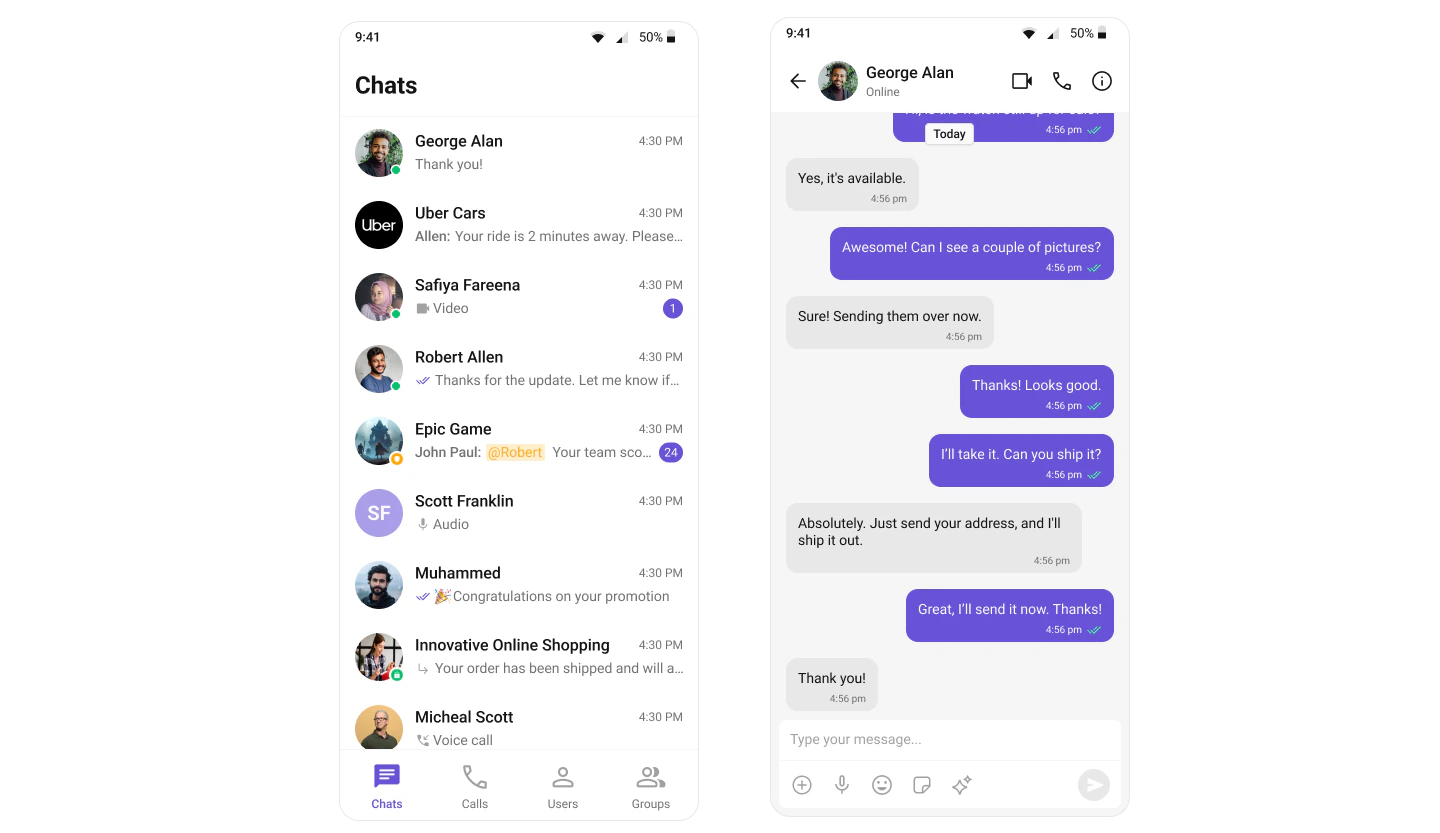
  1. Bottom navigation bar — switches between Chats, Calls, Users, and Groups
  2. Content area — renders the CometChat component for the active tab
This uses Android’s BottomNavigationView with Fragments: TabbedActivity hosts the navigation and fragment container, user taps a tab, the corresponding Fragment loads.

Step 1: Set Up the Tabbed Screen

Create a new Activity called TabbedActivity with BottomNavigationView.Layoutactivity_tabbed.xml:
activity_tabbed.xml
<?xml version="1.0" encoding="utf-8"?>
<LinearLayout
    xmlns:android="http://schemas.android.com/apk/res/android"
    xmlns:app="http://schemas.android.com/apk/res-auto"
    android:id="@+id/main"
    android:layout_width="match_parent"
    android:layout_height="match_parent"
    android:orientation="vertical">

    <FrameLayout
        android:id="@+id/fragmentContainer"
        android:layout_width="match_parent"
        android:layout_height="0dp"
        android:layout_weight="1"/>

    <com.google.android.material.bottomnavigation.BottomNavigationView
        android:id="@+id/bottomNavigationView"
        android:layout_width="match_parent"
        android:layout_height="wrap_content"
        app:menu="@menu/bottom_nav_menu"/>

</LinearLayout>
Menures/menu/bottom_nav_menu.xml:
bottom_nav_menu.xml
<?xml version="1.0" encoding="utf-8"?>
<menu xmlns:android="http://schemas.android.com/apk/res/android">
    <item android:id="@+id/nav_chats" android:icon="@drawable/ic_chats" android:title="Chats"/>
    <item android:id="@+id/nav_call_logs" android:icon="@drawable/ic_calls" android:title="Calls"/>
    <item android:id="@+id/nav_users" android:icon="@drawable/ic_user" android:title="Users"/>
    <item android:id="@+id/nav_groups" android:icon="@drawable/ic_group" android:title="Groups"/>
</menu>
ActivityTabbedActivity.kt:
TabbedActivity.kt
import android.os.Bundle
import androidx.activity.enableEdgeToEdge
import androidx.appcompat.app.AppCompatActivity
import androidx.core.view.ViewCompat
import androidx.core.view.WindowInsetsCompat
import androidx.fragment.app.Fragment
import com.google.android.material.bottomnavigation.BottomNavigationView

class TabbedActivity : AppCompatActivity() {

    private lateinit var bottomNav: BottomNavigationView

    override fun onCreate(savedInstanceState: Bundle?) {
        super.onCreate(savedInstanceState)
        enableEdgeToEdge()
        setContentView(R.layout.activity_tabbed)

        ViewCompat.setOnApplyWindowInsetsListener(findViewById(R.id.main)) { v, insets ->
            val bars = insets.getInsets(WindowInsetsCompat.Type.systemBars())
            v.setPadding(bars.left, bars.top, bars.right, bars.bottom)
            insets
        }

        bottomNav = findViewById(R.id.bottomNavigationView)

        bottomNav.setOnItemSelectedListener { item ->
            replaceFragment(
                when (item.itemId) {
                    R.id.nav_chats -> ChatsFragment()
                    R.id.nav_call_logs -> CallLogsFragment()
                    R.id.nav_users -> UsersFragment()
                    R.id.nav_groups -> GroupsFragment()
                    else -> ChatsFragment()
                }
            )
            true
        }

        if (savedInstanceState == null) {
            replaceFragment(ChatsFragment())
        }
    }

    private fun replaceFragment(fragment: Fragment) {
        supportFragmentManager.beginTransaction()
            .replace(R.id.fragmentContainer, fragment)
            .commit()
    }
}

Step 2: Create Tab Content

Create a Fragment for each tab. Each Fragment inflates a layout containing the corresponding CometChat component.ChatsFragment:
ChatsFragment.kt
import android.os.Bundle
import android.view.LayoutInflater
import android.view.View
import android.view.ViewGroup
import androidx.fragment.app.Fragment

class ChatsFragment : Fragment() {
    override fun onCreateView(inflater: LayoutInflater, container: ViewGroup?, savedInstanceState: Bundle?): View? {
        return inflater.inflate(R.layout.fragment_chats, container, false)
    }
}
fragment_chats.xml
<?xml version="1.0" encoding="utf-8"?>
<FrameLayout xmlns:android="http://schemas.android.com/apk/res/android"
    android:layout_width="match_parent"
    android:layout_height="match_parent">

    <com.cometchat.uikit.kotlin.presentation.conversations.ui.CometChatConversations
        android:id="@+id/conversations"
        android:layout_width="match_parent"
        android:layout_height="match_parent" />

</FrameLayout>
CallLogsFragment:
CallLogsFragment.kt
import android.os.Bundle
import android.view.LayoutInflater
import android.view.View
import android.view.ViewGroup
import androidx.fragment.app.Fragment

class CallLogsFragment : Fragment() {
    override fun onCreateView(inflater: LayoutInflater, container: ViewGroup?, savedInstanceState: Bundle?): View? {
        return inflater.inflate(R.layout.fragment_call_logs, container, false)
    }
}
fragment_call_logs.xml
<?xml version="1.0" encoding="utf-8"?>
<FrameLayout xmlns:android="http://schemas.android.com/apk/res/android"
    android:layout_width="match_parent"
    android:layout_height="match_parent">

    <com.cometchat.uikit.kotlin.presentation.calllogs.ui.CometChatCallLogs
        android:id="@+id/call_logs"
        android:layout_width="match_parent"
        android:layout_height="match_parent" />

</FrameLayout>
UsersFragment:
UsersFragment.kt
import android.os.Bundle
import android.view.LayoutInflater
import android.view.View
import android.view.ViewGroup
import androidx.fragment.app.Fragment

class UsersFragment : Fragment() {
    override fun onCreateView(inflater: LayoutInflater, container: ViewGroup?, savedInstanceState: Bundle?): View? {
        return inflater.inflate(R.layout.fragment_users, container, false)
    }
}
fragment_users.xml
<?xml version="1.0" encoding="utf-8"?>
<FrameLayout xmlns:android="http://schemas.android.com/apk/res/android"
    android:layout_width="match_parent"
    android:layout_height="match_parent">

    <com.cometchat.uikit.kotlin.presentation.users.ui.CometChatUsers
        android:id="@+id/users"
        android:layout_width="match_parent"
        android:layout_height="match_parent" />

</FrameLayout>
GroupsFragment:
GroupsFragment.kt
import android.os.Bundle
import android.view.LayoutInflater
import android.view.View
import android.view.ViewGroup
import androidx.fragment.app.Fragment

class GroupsFragment : Fragment() {
    override fun onCreateView(inflater: LayoutInflater, container: ViewGroup?, savedInstanceState: Bundle?): View? {
        return inflater.inflate(R.layout.fragment_groups, container, false)
    }
}
fragment_groups.xml
<?xml version="1.0" encoding="utf-8"?>
<FrameLayout xmlns:android="http://schemas.android.com/apk/res/android"
    android:layout_width="match_parent"
    android:layout_height="match_parent">

    <com.cometchat.uikit.kotlin.presentation.groups.ui.CometChatGroups
        android:id="@+id/groups"
        android:layout_width="match_parent"
        android:layout_height="match_parent" />

</FrameLayout>
Download the navigation icons from the CometChat UI Kit repository and place them in your res/drawable/ directory.

Step 3: Launch the Tabbed Screen

Launch TabbedActivity from your MainActivity after successful login:
MainActivity.kt
private fun loginUser() {
    CometChatUIKit.login("cometchat-uid-1", object : CometChat.CallbackListener<User>() {
        override fun onSuccess(user: User) {
            Log.d(TAG, "Login successful: ${user.uid}")

            // Launch Tab-Based Chat Experience
            startActivity(Intent(this@MainActivity, TabbedActivity::class.java))
        }

        override fun onError(e: CometChatException) {
            Log.e(TAG, "Login failed: ${e.message}")
        }
    })
}

Step 4: Register Activity & Permissions

Add the activity to your AndroidManifest.xml:
AndroidManifest.xml
<application ...>
    <activity android:name=".TabbedActivity" />
</application>
Ensure you’ve added the required permissions in your AndroidManifest.xml:
AndroidManifest.xml
<uses-permission android:name="android.permission.INTERNET" />
<uses-permission android:name="android.permission.ACCESS_NETWORK_STATE" />
For call features, also add:
AndroidManifest.xml
<uses-permission android:name="android.permission.CAMERA" />
<uses-permission android:name="android.permission.RECORD_AUDIO" />
<uses-permission android:name="android.permission.MODIFY_AUDIO_SETTINGS" />

Next Steps

Components Overview

Explore all available UI Kit components and their customization options

Theming

Customize colors, fonts, and styles to match your brand

Integration

Back to the main integration guide

Feature Guides

Add capabilities like threaded messages, blocking, and group management